The Mission Editor is a built-in editing program used to create custom missions and campaigns. It can work with custom Maps created in the Map Editor. It can be accessed through VTOL VR's main menu with the Mission Editor button. Alternatively, it can also be accessed through a Mission Editor button on the monitor, which can be clicked with the mouse.
Main Menu[]
Upon opening the Mission Editor, there are three options available: Campaign Editor, Standalone Mission, and Steam Workshop. Standalone Mission allows for the creation of individual Missions, Campaign Editor allows for the creation of multiple Missions packaged up into a Campaign, and Steam Workshop allows custom Maps to be picked from the Workshop for use in the Mission Editor.
Campaign Editor[]
The Campaign Editor window lets players create a new Campaign or access an existing one for editing. Selecting New Campaign will allow players create a new Campaign file, determining the Campaign's filename and vehicle beforehand.
The Campaign Editor UI allows players to set up the structure of their Campaigns.
Standalone Mission[]
The Standalone Mission UI allows players to create new Standalone Missions or edit existing ones.
Steam Workshop[]
The Steam Workshop button allows custom maps to be downloaded through the Workshop for use in Missions.
Multiplayer Campaigns[]
To set up a Multiplayer Campaign in the Mission Editor, open the Campaign Editor from the Main Menu, select New Campaign..., check the Multiplayer Box, and click save after naming the campaign file. Checking the Multiplayer option disables the Vehicle option, as that is set for each individual player slot later on. Individual Multiplayer campaigns can also be used for individual missions.
Overview[]
Unit value[]
Units in editor are in meters for altitude & distance, meters/seconds for speed and seconds for time.
Controls[]
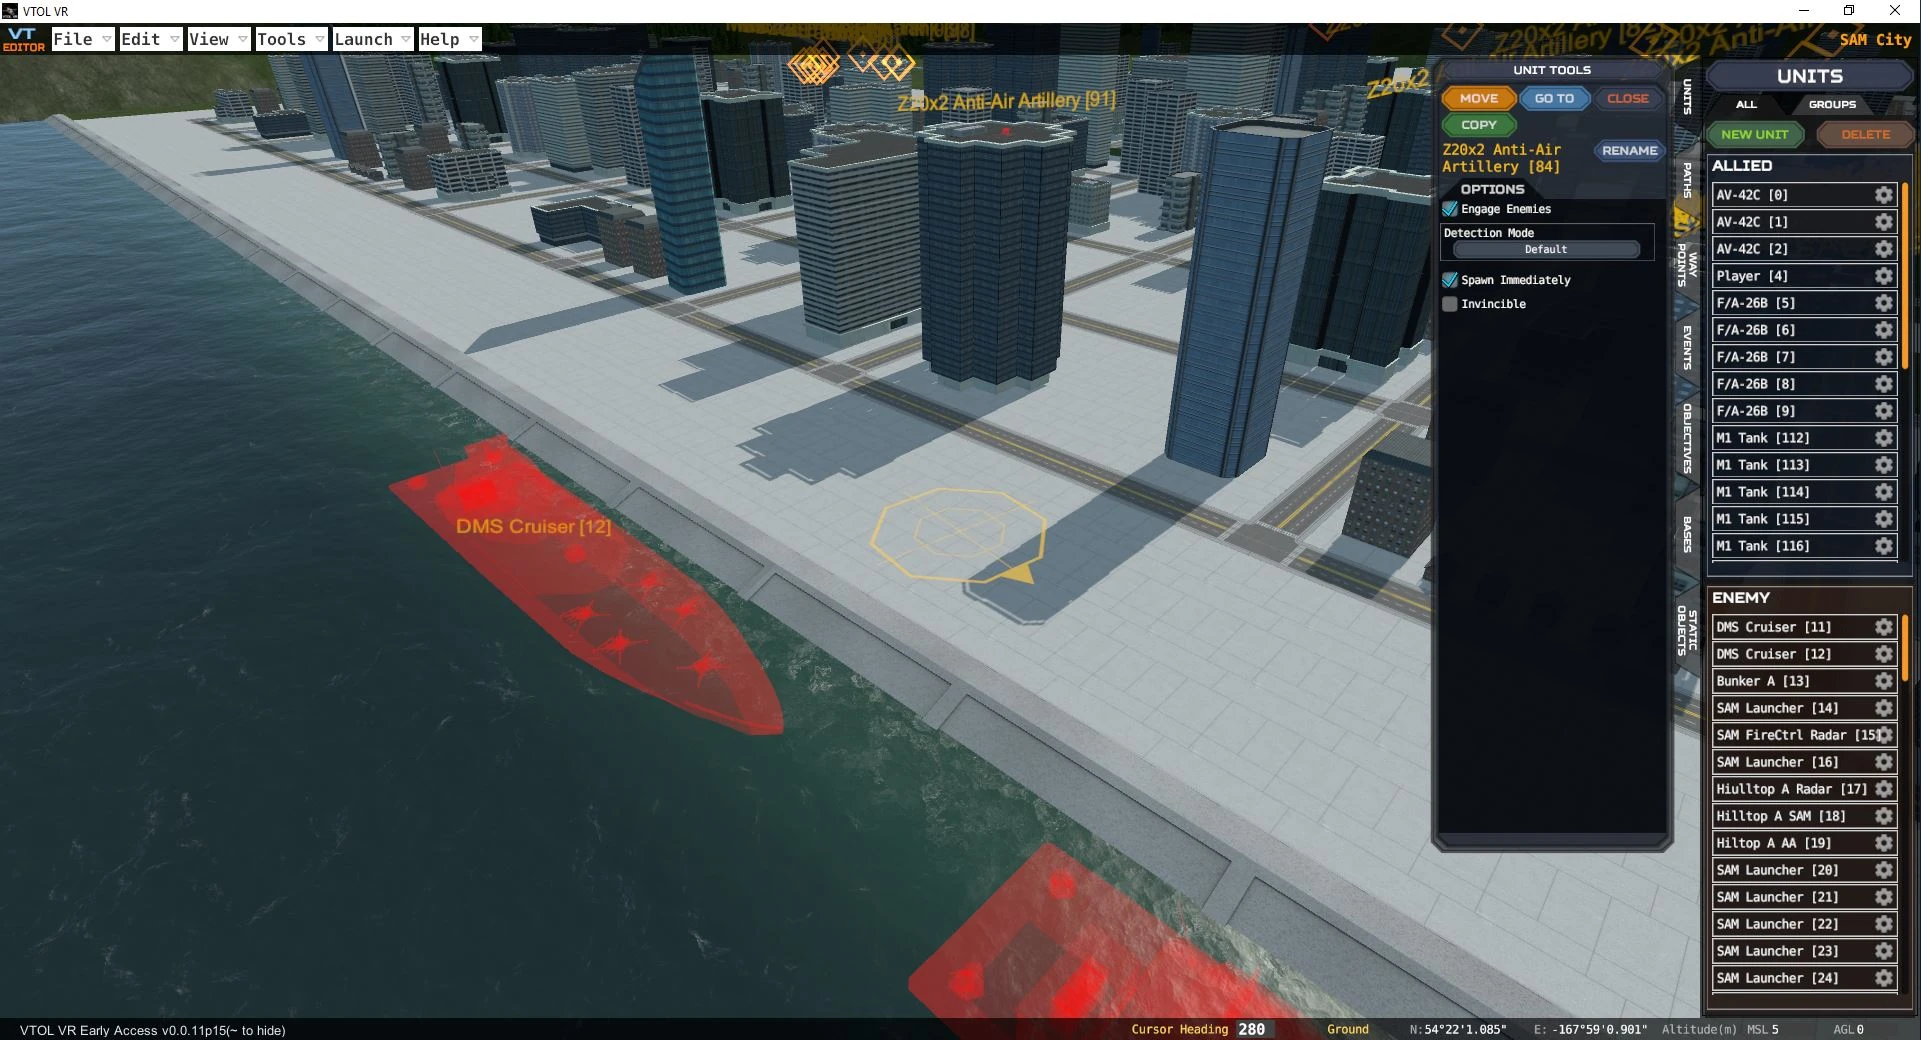
The Mission Editor's UI.
Camera[]
- Rotation: Right-click + Mouse movement.
- Zoom: Scroll wheel. Zooms relative to the Editor Cursor, not the Mouse cursor.
Cursor[]
- Movement: WASD or Arrow keys.
- Fast Movement: Shift + Movement.
- Drag World: Middle-Click + Mouse movement.
- Drag Rotation: Shift + Middle-Click.
- Teleport: Double-Click.
- Rotation: Q, E. Rotates the Editor Cursor.
- Change Altitude: Shift + Scroll wheel, or Z (Decrease altitude) or X (Increase altitude).
Shortcuts[]
- New Unit: U
- Validate new unit / Position : Space
- Measure tool : R
The Editor Cursor is where the camera view is centered about. It is also the point used as the center for placing Units, Objects, Way Points, or other Editor modules.
Top Menu Bar[]
File[]
- Save: Saves the current Mission file. Shortcut: Ctrl+S.
- Save As...: Saves the current Mission file as a new file. Shortcut: Ctrl+Shift+S.
- New: Resets the map to its default state, clearing all Units, Way Points, etc. for a new Mission. Shortcut: Ctrl+N.
- Open: Opens up the Mission file selection UI. Shortcut: Ctrl+O.
- Quit: Closes the Scenario Editor and returns to the Mission Editor's Main Menu. No shortcut available.
Edit[]
- Scenario Info: Opens up the Scenario Info UI for the current Mission. Shortcut: Ctrl+I.
- Main article: Mission Editor/Scenario Info
- Global Values: Opens up the Global Values UI. Used for setting Variables in the Mission Editor. No shortcut available.
- Main article: Mission Editor/Global Values
View[]
- Minimap: Opens up a Minimap UI for map navigation. Zooms up to 1 time inwards and 8 times outwards, relative to its starting zoom value. A button at the lower-right corner of the Minimap allows its size to be changed. Shortcut: Ctrl+M.
- Recenter: Moves the Editor Cursor to the map's origin point. No shortcut available.
Tools[]
- Measure: Enables the Mission Editor's measuring tool. Click a point on the terrain and drag your mouse out to measure out distance from one point to another. It also displays a circle, whose radius is represented by the line drawn. Two values are shown in the top margin: the direction the line is pointing towards and the length of the line itself. Useful for determining the desired ratio for Triggers. Shortcut: R.
- Repack Map: Updates the Mission's associated map file with the latest copy available in the Map Editor. May result in Units or Triggers being displaced over or underneath newly adjusted terrain. No shortcut available.
Launch[]
- Launch Scenario: Opens up the Scenario Launcher UI for testing created missions. Players can choose their Profile and set Invincible on if desired for testing purposes. Shortcut: Ctrl+L.
Steam[]
- Upload: Publishes a Mission to Steam. Workshop page details must be configured separately. No shortcut available.
Help[]
- Controls: Displays the Editor Controls reference UI. No shortcut available.
Right Menu Bar[]
Units[]
This tab allows for the placement of Units. Click the New Unit button and a UI will pop up where you can choose a Unit to place down. The Unit you choose will spawn in at the Editor Cursor's position facing towards the Cursor's direction.
A cog will also be located within each unit's space in the list; clicking it will bring up the Unit's config options. This UI can be used to set a Unit's AI behavior, their armament, etc.
Paths[]
The Path tab allows the player to place down Paths, which can be used for unit navigation or as GPS point paths for the player to follow. A path consists of a list of points connected sequentially down the list. The Path Mode option changes the way in which the points are chained together. Its default option is "Smooth", but it can also be set to "Linear" or "Bezier" to change the way the path's curves are represented. There is also an option to reverse the order they are listed, which flips the points around on the list. The Loop option connects the first and last point to create a continuous circuit. This is useful for creating continuous patrol routes for Units to move through.
Waypoints[]
The Waypoints tab allows players to place down Waypoints on the map. A Waypoint consists of coordinates and an altitude. The coordinates alone would snap the Waypoint to the ground. The altitude specifies how high to raise the point above the ground. Waypoints can be used...
- To program GPS targets when sent to the player through Events > Actions > System > Send wpt to GPS.
- As targets for artillery, bomber, and other unit attacks.
- As the landing spot for a VTOL.
- As the point a trigger zone should be centered about.
Events[]
The Events tab is for adding in Events, which function as triggers for unit orders and other game responses. Events are a sequence of actions in triggered, timed, or sequential variants. Events have a "Begin" state that can trigger immediately upon starting the scenario, after a certain amount of time, or even manually through other Events.
Main Article: Mission Editor/Events
Objectives[]
Missions use Objectives to direct the player's actions and goals. They can also score actions with money which carrier over to other missions in a campaign. Objectives can be viewed by the player on the MFCD and there is a notification on the HUD for new objectives.
Main Article: Mission Editor/Objectives
Bases[]
Bases (airbases) offer a number of services to players and air units, such as rearming and refueling. These interact with the existing bases added through the Map Editor and can be used to determine two airbase properties:
- Name - Determines the name of the airbase, visible in the MFCD comms menu.
- Side - Determines whether the airbase is Allied- or Enemy-occupied. Allied units cannot land at enemy airbases and vice-versa.
Static Objects[]
Static Objects are decorative objects that can be set up per mission. These can be used to set up bases, helipads, and even oil rigs, which are the only semi-destructible objects in the game.
Bottom Bar[]
This bar provides a few miscellaneous resources for cursor map navigation:
- Cursor Heading: Displays the Heading (direction) the Editor Cursor is pointed towards. Can be given a specific Heading to point towards with the included text box.
- Cursor State: Displays what surface the cursor is currently on: Ground, Sea, or Air.
- Cursor Coordinates: Provides the current coordinates the cursor is located at, relative to the lower-leftmost corner of the map. Displayed in geographic coordinate notation.
- Altitude(m): Displays the cursor's current Altitude in Meters. MSL represents sea-level-relative altitude while AGL represents ground-relative altitude. The values can be manually set with one of the included text boxes. You can also set these boxes to display in imperial units (feet) by clicking on the unit and vice-versa.
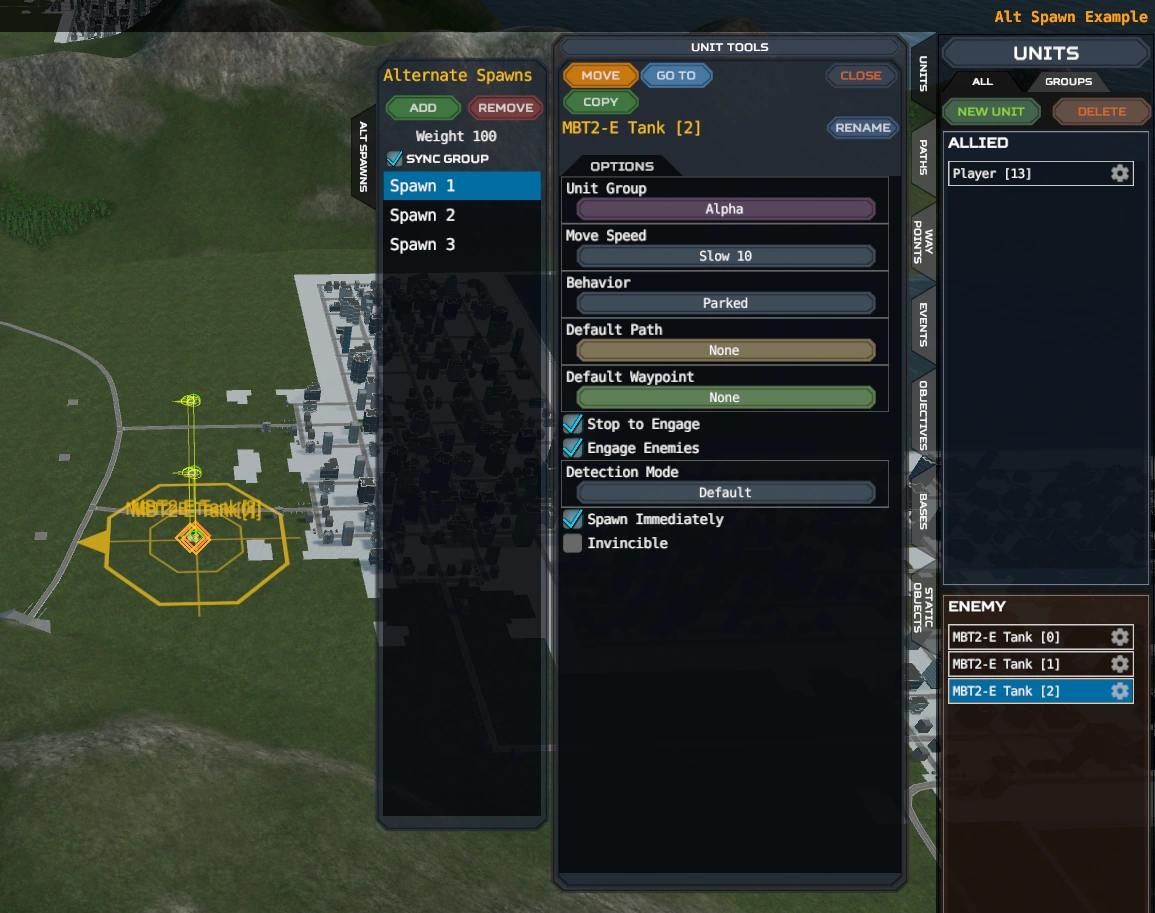
Alternate spawn points[]
Units can have alternative spawn points, which can be useful to improve replay-ability of a mission.
- Spawn 1 is the unit, while Spawn 2, Spawn 3, Spawn 4 etc... are the alternate spawn points.
- Each alternate spawn point has its own behavior setting (ex: you can spawn a tank parked on Spawn 1, but on a patrol path if it spawns on Spawn 2). Keep in mind that grouped unit can only realize order given via event to their UnitGroup.
- Alternate spawn point weight determinate how much chance that spawn point has against the other points to be selected on spawning. Having 2 spawn point at 100 means 50% chance for each.
- When Sync group is enabled, it makes all units of the group to spawn on the same selected alternate spawn point number. Sync grouping will automatically create the same amount of alternate spawn point on all unit at each unit position if they don't already exist, so make sure to select and move the spawn points at the proper location, (ex: Spawn 2 of each unit are around the farm, Spawn 3 of each unit are around the city, etc...). Also make sure the Spawn immediately setting of your alt spawn point is matching the one used by spawn 1 (in case you want to spawn the group manually).
Mission testing[]
Main article: VTOL VR Wiki:How To Take In-Game Pictures
Mission makers can use the Developer Camera to observe and debug the behaviors of their AI without actually joining the Mission itself. To launch a Mission without using a headset:
- Make sure equipment is not configurable in the Scenario Info (to avoid the loadout screen)
- Press R to skip the "Equip Helmet" screen